Sometimes you may need to lock specific cells or ranges like some important reference table or value but allow data entry in other cells or range in the same sheet.
In this Excel article, you will see how to lock or protect specific cells in a sheet, manually and using VBA.
You will also see how to automatically lock cells after making data entry in an Excel sheet.
Lock (protect) specific cells in Excel
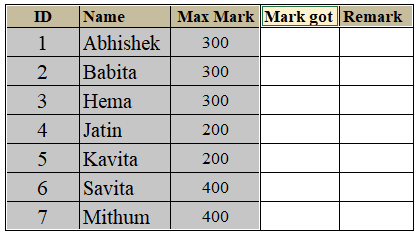
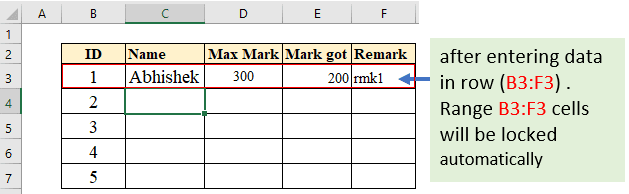
In the below image a teacher needs to fill Marks got and Remark column.
If you keep this table range completely unprotected/unlocked then by mistake Id, Name, Max mark can be edited.
Here keeping ID, Name, Max Mark column, and heading range as the non-editable (locked) range is important but at the same time Marks got and Remark column should be editable (unlocked).
Also other blank cells should be editable.
Let’s see how to protect or lock specific cells in Excel.

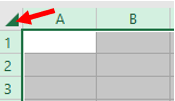
1 – First, select all cells of the sheet. To select all the cells mouse click on the triangular shape sign present at the upper left corner of a sheet.
2 – Keeping selection intact (do not mouse click on any cell or use arrow key buttons), press CTRL+1 shortcut key to bring Format cells pane.
Alternatively, you can right mouse click then click on Format Cells options to bring Format cells pane.

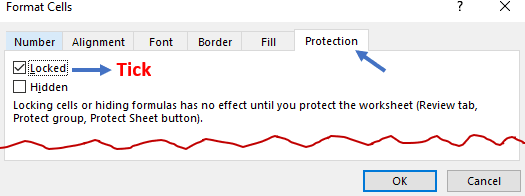
3 – In the Format Cells pane click on the Protection tab. Untick the Locked option then click on the OK button.
This process will make all the cells of the sheet editable even after sheet protection.
Note:- By default cells are formatted to locked status, hence protecting the sheet will lead to the protection of all the cells.
Locking or protection is applied only on locked cells after sheet protection.

4 – Now select the cells/range which need to be locked (uneditable/protected) after sheet protection.
In this example heading range and Id, Name, Max mark columns need to be locked.
5 – Keeping selection intact press CTRL+1 to bring Format cells pane. Go to Protection tab then Tick Locked option.
5 – Go to the Review tab and click on Protect sheet option. Enter appropriate password and press OK.
Now heading range and Id, Name, Max mark columns got locked and can not be edited but you can edit Mark Got and Remark column.
Note:- The idea behind locking specific cells in Excel is that protection is applied only on cells formatted to locked status, so format other cells to unlocked status in which you want to do editions even after the sheet protection.

VBA to quickly lock specific cells in Excel
In the manual method to lock specific cells, you have to follow the steps which is time-consuming.
You can use the below VBA code to quickly lock only selected cells in an active worksheet.
How to use the VBA code?
- Copy-paste below code section in a standard module. Suggested Reading: How to insert and run VBA code in Excel?
- After copy-pasting select range or cell to protect then run the VBA code.
To run the code you can assign a shortcut key to this VBA or macro and use this shortcut to run VBA.
Sub lockOnlySelection()
 'protects or locks only selected cells or range
 Dim pw As String
 pw = "abc" 'You can change password

 If ActiveSheet.ProtectContents = True Then
  'if sheet is protected then unprotect
   ActiveSheet.Unprotect Password:=pw
 End If

 ActiveSheet.Cells.Locked = False
 Selection.Locked = True
 ActiveSheet.Protect Password:=pw
End Sub
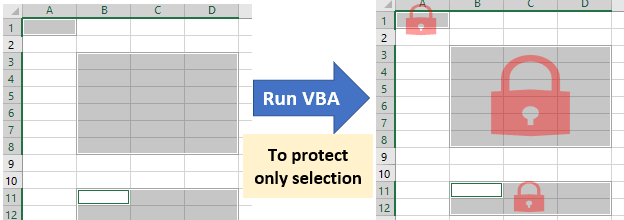
In the below image 3 non-contiguous range or cells (B3:D8, B11:D12, A1) are selected.
After running the above VBA code only the selected range (B3:D8, B11:D12, A1) gets locked or protected.
You can write or edit in other cells except for this range (B3:D8, B11:D12, A1)
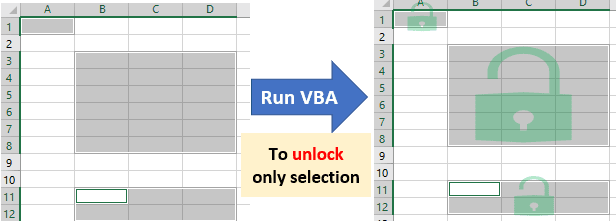
VBA to unlock specific cells in Excel
You can use the below VBA code to unlock or unprotect selected cells only.
Sub UnlockOnlySelection()
 'Unprotects or Unlocks only selected cells or range
 'or makes only selected cells editable
 Dim pw As String
 pw = "abc" 'You can change password

 If ActiveSheet.ProtectContents = True Then
  'if sheet is protected then unprotect
   ActiveSheet.Unprotect Password:=pw
 End If

 ActiveSheet.Cells.Locked = True
 Selection.Locked = False
 ActiveSheet.Protect Password:=pw
End Sub
In the below image cells (B3:D8, B11:D12, A1) are selected.
After running the above VBA code you can make entries or do editions in these cells only.
Other cells except for range (B3:D8, B11:D12, A1) are locked.
Protect multiple sheets at once Excel VBA
Below is the VBA code to protect multiple sheets at once.
Copy-paste the below code section in the standard module.
In the below code line you can change the sheets tab names as per your requirement.
shtNmAr = Array(“Student”, “Category”, “Brand”)
Sheet tab names should be separated by commas and should be enclosed between double-quotes.
Make sure there should not be leading or trailing spaces in sheet tab names.
Sub protectSpecificSheets()
'makes all cells of the sheet locked
  Dim shtNmAr As Variant
  Dim sht As Variant, pw As String

  'mention sheets names to be protected
  shtNmAr = Array("Student", "Category", "Brand")
  pw = "abc" 'you can change password

  For Each sht In shtNmAr
    On Error Resume Next
    With Worksheets(sht)
      .Unprotect pw
      .Cells.Locked = True
      .Protect pw
    End With
  Next sht
End Sub
If you are looking for protecting all the worksheets of a workbook then click the below link
How to lock or protect cells after data entry in Excel?
In the below image if you fill record range B3 to F3 completely then this range will be locked (protected) automatically.
You can not do editions after making a complete entry in a given record or row.
Only blank cells of the table will be available for making data entries.
Below is the VBA code for protecting or locking cells after doing data entry in an Excel sheet.
Copy-paste the below code in the Standard module of the VBA IDE.
How to insert and run VBA code in Excel?
This “protectRecord” procedure or subroutine takes 3 inputs.
entryArea – table range in which entries to be done. As per the above image, it is Range(“B3:F7”).
cel – is the cell which is just got edited or entry is done. Always input Target.
forEachCel – It is boolean value (True / False). False will auto-protect only after making a complete entry in a row.
True will auto-protect a just edited cell or a cell in which entry is done.
Sub protectRecord(entryArea As Range, cel As Range, forEachCel As Boolean)
'protects record range or cell after entry

'entryArea- table range in which entries to be done
'cel - is cell which is just edited always use Target for this
'forEachCel - whether protect a cell after entry (True)
'or after completete entry in row or record (False)

Dim pw As String
Dim entryRw As Long, ttlClmns As Integer
Dim rcrdRng As Range, clmnEnetred As Byte

pw = "abc"

If Not Intersect(cel, entryArea) Is Nothing And forEachCel _
And cel.Value <> "" Then
   ActiveSheet.Unprotect pw
   cel.Locked = True
   ActiveSheet.Protect pw
   Exit Sub
 End If

  entryRw = cel.Row
  ttlClmns = entryArea.Columns.Count
  Set rcrdRng = _
  Cells(entryRw, entryArea.Cells(1, 1).Column).Resize(1, ttlClmns)
  clmnEnetred = Application.WorksheetFunction.CountA(rcrdRng)

  If Not Intersect(cel, entryArea) Is Nothing _
  And clmnEnetred = ttlClmns Then
      ActiveSheet.Unprotect pw
      rcrdRng.Locked = True
      ActiveSheet.Protect pw
  End If
End Sub
How to use the above code?
- Copy-paste the above code section in the standard module
- Select the table range in which data entry is to be done then press CTRL+1 then click on the Protection tab and untick the Lock option then click on the Ok button.
- Then open the sheet module (as per image sheet module of Student (2) sheet) and paste the below code section. You can modify the range as per your requirement.
Note:- Make sure event is enabled so that code can run automatically after data entry.
To enable the event run the below VBA code in the Immediate Window of VBA IDE.
Application.EnableEvents=True

Private Sub Worksheet_Change(ByVal Target As Range)
   Module1.protectRecord Range("B3:F7"), Target, False
End Sub
In the above code Module1 is the standard module name in which Sub “protectRecord” is placed or pasted.
If you have pasted it in another standard module then replace Module1 with that module name.
Click and download the related workbook protect cell or range after data entry in excel